
Now it’s time to configure the database of our project. In this part of the tutorial we will cover MySQL, and in part VII.a we will cover PostgreSQL. Feel free to choose whichever you want! 🙂
However, keep in mind that in a later part of this tutorial we will deploy our app in Heroku, and we will use PostgreSQL. So if you don’t know which database to configure, I would recommend PostgreSQL 😉
The outline of this part is the following:
- Install MySQL
- Create a MySQL Database
- Install the MySQL Django adapter, mysqlclient
- Configure the Django Database Settings
- MySQL Workbench
Let’s start! 🙂
Install MySQL
First, we need to download the MySQL Community Server form the official site. Select your platform and download the file (you will be asked to create an oracle account, but you can skip it by clicking at the link at the bottom of the page).
For a Mac OS X, you should have a dmg file. After clicking on it to install MySQL, you will have to double click on the .pkg file to install it.
Next, we need to modify the $PATH so that the mysql command lines are available in your terminal. Edit the ~/.bash_profile file and add the following:
export PATH=$PATH:/usr/local/mysql/bin
Close your terminal and open it again.
Next, we need to start mysql:
$ sudo /usr/local/mysql/support-files/mysql.server start
Next, create a username with a password:
$ mysqladmin -u root password yourpassword
If you need to change the roopt password use:
$ mysqladmin -u root -p'oldpassword' password newpassword
Note: there is no space between the -p and the old password.
Create a MySQL Database
Next, open mysql using the root account
$ mysql -u root -p
Enter password:
Now that we are inside the mysql console with root privileges, we will create a database, a user, and grant all privileges to that user:
CREATE DATABASE taskbuster_db;
CREATE USER 'username'@'localhost' IDENTIFIED BY 'your_password';
GRANT ALL PRIVILEGES ON taskbuster_db.* TO 'username'@'localhost';
FLUSH PRIVILEGES;
quit
You can check the grants for a given user with:
show grants for 'username'@'localhost';
Install the MySQL Django adapter, mysqlclient
Next, we need to install a MySQL database adapter for Python: the mysqlclient package. In the development enviroment:
$ pip install mysqlclient
and add it into your requirements/base.txt file as:
# requirements/base.txt
...
mysqlclient==1.3.6
Next you have to install it into your testing environment, where you can use:
$ pip install -r requirements/testing.txt
Configure the Django Database Settings
Now, we need to edit the settings for developing and testing (only local). Edit the files settings/testing.py and settings/development.py and add the following:
DATABASES = {
    'default': {
        'ENGINE': 'django.db.backends.mysql',
        'NAME': get_env_variable('DATABASE_NAME'),
        'USER': get_env_variable('DATABASE_USER'),
        'PASSWORD': get_env_variable('DATABASE_PASSWORD'),
        'HOST': '',
        'PORT': '',
    }
}
Remember that these files import from the settings/base.py file, in which we defined the get_env_variable function as:
from django.core.exceptions import ImproperlyConfigured

def get_env_variable(var_name):
    try:
        return os.environ[var_name]
    except KeyError:
        error_msg = "Set the %s environment variable" % var_name
        raise ImproperlyConfigured(error_msg)
Next, edit the postactivate file of each environment:
$ vi $VIRTUAL_ENV/bin/postactivate
and add the Database settings:
export DATABASE_NAME='taskbuster_db'
export DATABASE_USER='myusername'
export DATABASE_PASSWORD='mypassword'
Now edit the predeactivate file of each enviroment and add:
unset DATABASE_NAME
unset DATABASE_USER
unset DATABASE_PASSWORD
To make these changes effective, you need to deactivate and activate the environments.
Ok, now we are ready to check, sync and migrate our database.
$ python manage.py check
$ python manage.py migrate
You will be asked to create a super user, so create one now 😉 If you’re not asked to create one, you might want to do so with:
$ python manage.py createsuperuser
Finally, let’s run our tests to see that everything works as expected!
$ python manage.py test
If you get any of the following erros:
Got an error creating the test database: (1044, "Access denied for user 'username'@'localhost' to database 'test_taskbuster_db'")
django.db.utils.OperationalError: (1142, "SELECT command denied to user 'username'@'localhost' for table 'django_migrations'")
Got an error recreating the test database: (1044, "Access denied for user 'username'@'localhost' to database 'test_taskbuster_db'")
you have to grant the User the correct privileges. To grant them all privileges (including creation and deletion of a database) use:
mysql> GRANT ALL PRIVILEGES ON *.* TO 'username'@'localhost';
mysql> FLUSH PRIVILEGES;
Hope is everything ok?!! Did you see how useful are tests? Now we know that after changing the database, everything works as good as before 😉
MySQL Workbench
Download MySQL Workbench from the official site and install it in your computer. Next, open the application and select your local instance.
On the left menu you should see your database, here, the taskbuster_db. You can navigate through the tables and elements of your database and see their properties on the bottom-left box.
One think I really like of MySQL Workbench is that it allows me to see the database structure. To do so, go to Database –> Reverse Engineer… in the upper menu. Select the user to connect to the database (for example, the root user), select the taskbuster_db and click continue.
At the end of this wizard you’ll see the structure of your database 🙂
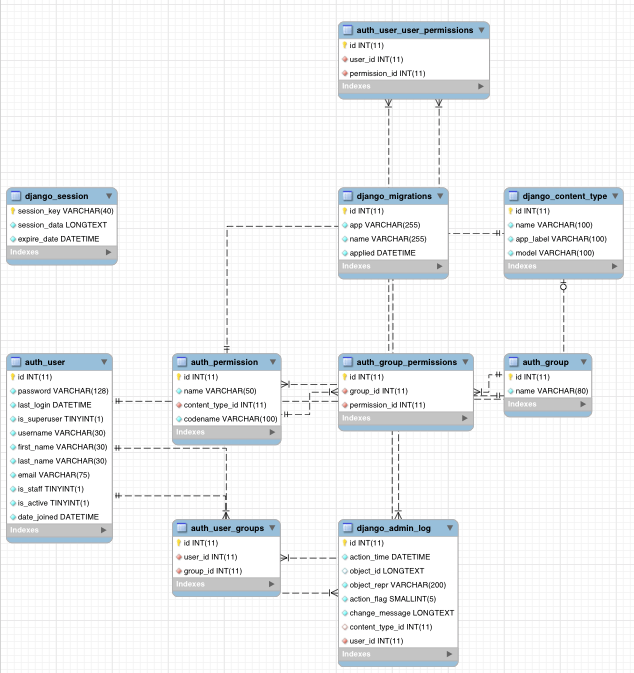
However! From here, you can make changes to the database tables and properties, so be carful because they will interfere with the structure defined in your Django models.
In the next part of this tutorial, we’ll cover User Authentication with social accounts, like for example Google or Twitter.
Keep working! 😉
Don’t forget to share it to your friends, they might find this tutorial helpful! Thanks!